Why this stage gets its own page
Two things in a bathroom renovation cannot be corrected afterwards without demolishing the room again: the falls in the floor, and the membrane over them. Everything else — a tap, a vanity, even the glass — is replaceable.
In a Ryde walk-up, the consequence of getting them wrong is not just your bathroom. It is the ceiling of the unit below, an insurance claim, and a conversation with an owners corporation that approved the work on the strength of your waterproofing specification.
Over an old concrete slab
The floor in a 1960s or 1970s block is a concrete slab with a hand-laid sand-and-cement bed on top, often 40 to 70 mm thick, with the waste pipes cast into it and the falls set by whoever was holding the screed board that day. Frequently there is no membrane under the tiles at all.
The sequence over that substrate:
- Everything off, down to slab. The bed goes, the old hob goes, the tile adhesive residue is ground back. This is the noisy, dusty part, and it happens inside the building's permitted hours.
- Inspect the slab. Cracks, honeycombing, exposed reinforcement and the actual condition of the cast-in pipework all show up here. Old cast-iron or early PVC wastes are assessed, and replacement is priced as a variation if needed.
- Prime, and treat the joints. The slab is prepared to the membrane manufacturer's requirements. Floor-to-wall junctions, corners and any movement joint get bond breakers and reinforcing, because that is where movement cracks a membrane.
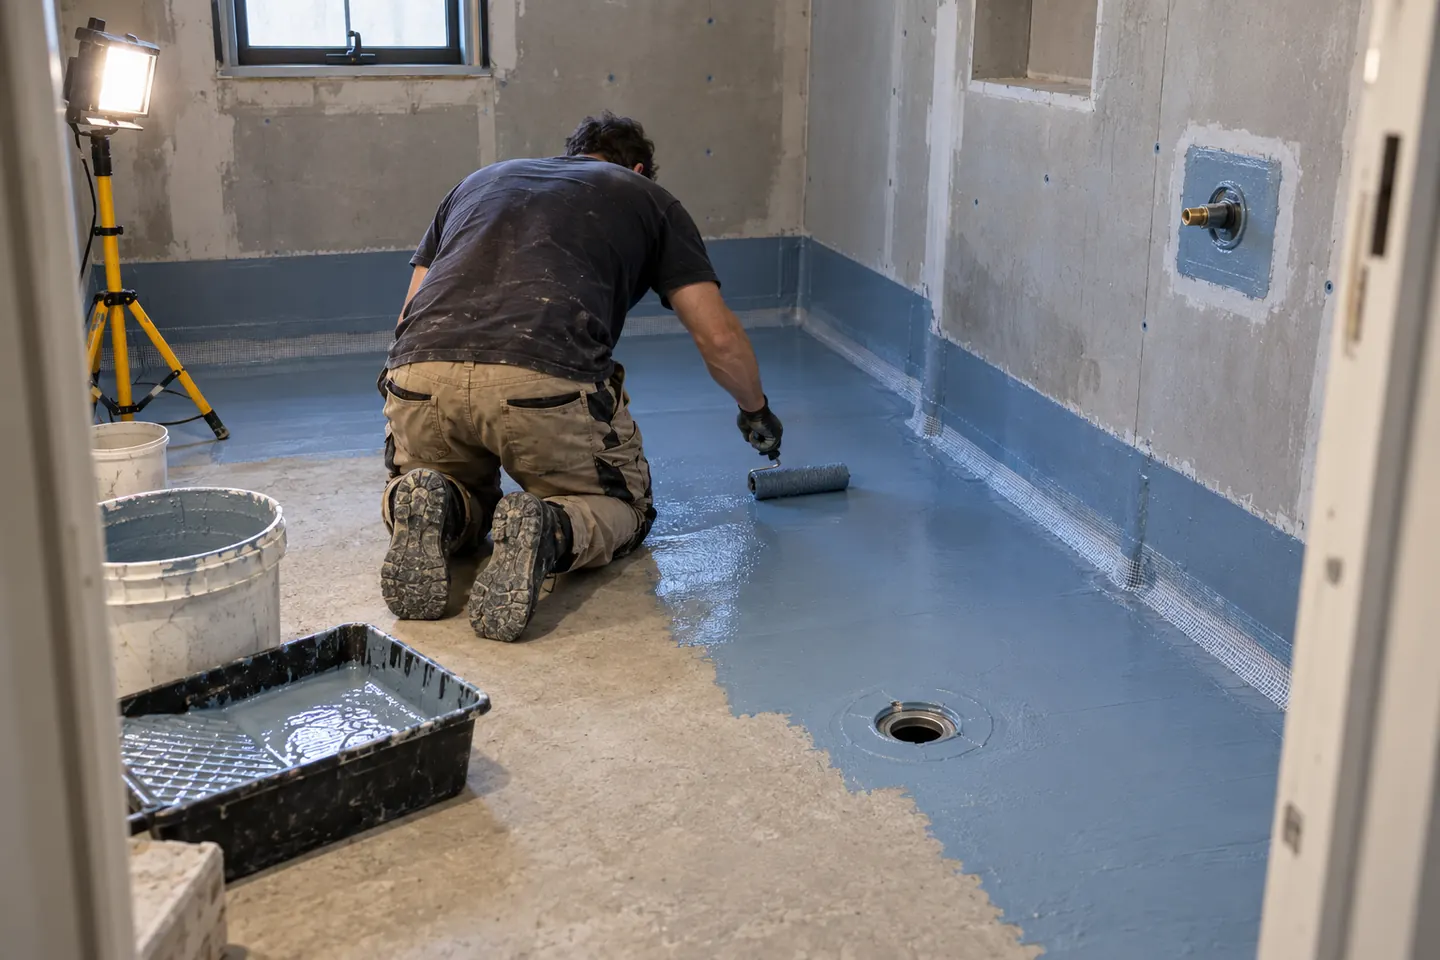
- Detail every penetration. The floor waste, the tap penetrations, the shower mixer body, the toilet waste. Each one is a hole through the waterproof layer and each one is detailed individually.
- Screed the falls. New falls to the drain, set out so that a hobless shower drains properly and the rest of the floor stays comfortable underfoot. A linear drain against a wall allows a gentler, single-direction fall, which is why it suits level-entry showers.
- Apply the membrane to the product's specification — the right number of coats, the right film thickness, the heights up the wall in the shower and elsewhere, with the manufacturer's cure time respected.
- Document it, so there is a record of product, areas and applicator.
In a post-war house on timber
Where the bathroom sits on a suspended timber floor, the problems change. Sheet flooring has to be sound, adequately fixed and stiff enough not to deflect under a tiled floor — movement is what cracks tiles and splits membranes. Joists and bearers under an old shower are inspected once the floor is open, because a shower with no membrane over fifty years does real damage to timber. Any replacement framing is priced before it is done.
Wet-area walls get sheeting rated for the job rather than ordinary plasterboard, and the junction between a timber floor and a masonry wall — a common detail in a rear addition — is treated as a movement joint, not a plaster corner.
Tiling: the part you look at every day
Good tiling in a small room is mostly set-out and preparation.
Set-out before ordering. We draw where the tiles land. Whole tiles at the wall you see from the doorway and at the shower entry; cuts pushed to the corner behind the door or under the vanity. A niche sized in whole tiles rather than a thin sliver at its edge.
Wall preparation. Old brick walls in these blocks are rarely flat. Rendering or sheeting to a flat, plumb plane is what lets a large-format tile sit without lipping. Skipping it is why so many 1990s renovations have tiles that catch the light unevenly.
Format that fits the room. A large tile reduces grout lines, which helps a small room, but only if it lands with sensible cuts. A slightly smaller format that fits the wall properly beats a fashionable one that needs a 40 mm sliver at every edge.
Full height, generally. Stopping wall tile at 1,500 mm leaves a line that halves the room visually and a painted band that grows mould. Taking tile to the ceiling costs more in tile and less in repainting every three years.
Grout and silicone. Grout close to the tile colour keeps the walls reading as surfaces rather than grids. Every internal corner and every floor-to-wall junction is silicone, not grout, because those junctions move — grout there cracks, and then the cracking gets blamed on the tiler.
Floor grip. Slip resistance is chosen for wet bare feet. Smaller floor tiles or a textured surface give more grip; a polished large-format floor in a shower is a decision to reconsider.
What your owners corporation will want
For a strata bathroom, the waterproofing paperwork is usually the centre of the approval. Expect to be asked for the membrane product and method, the trade licence details, certificates of currency, and confirmation that documentation will be provided on completion. Many buildings also want a by-law recording who maintains the new membrane in future. Our strata renovation rules guide walks through the general process, and the process page shows where approval sits in the program.
Waterproofing as a standalone job
Sometimes the room is fine and the shower is not. A shower leaking at the hob or at a cracked floor junction can occasionally be addressed without a full renovation, but be cautious about promises here: unless the tiles come up, nobody can see the state of the membrane underneath, and surface repairs to a failed membrane buy time rather than fix the problem. We will tell you which one you are buying.
Next
For budget, the cost page. For the full scope, the bathroom renovation page.
Renovation work is carried out in partnership with Coastal Renovation Group, a licensed NSW builder. Waterproofing, plumbing and electrical work are carried out by separately licensed trades. Licence and insurance details are provided on request.
Call 02 5563 0307 or describe the leak or the room.
Related work
| Full Bathroom Renovations | Main bathrooms stripped back to slab or frame and rebuilt, with the falls, the riser and the strata paperwork sorted before demolition day. |
|---|---|
| Ensuite Renovations | Tight ensuites reworked, and new ones found inside a robe or a hallway cupboard where the plumbing can reasonably reach. |
| Small Bathroom Renovations | The standard walk-up bathroom — bath under a shower, one small window, no storage — replanned to feel twice the size it measures. |
| Accessible Bathrooms | Step-free showers, blocking for grab rails and turning space, planned for people who intend to stay in the home they have. |
| Laundry Renovations | Internal laundries, balcony laundries and cupboard European laundries, sized around the machines people actually buy. |
| Rental Bathroom Renovations | Investor bathrooms in units near the university and the business park: hard-wearing, quick to turn around, priced as a whole. |
Questions people ask before they commit
Does waterproofing need a licence and a certificate?
Waterproofing of wet areas is licensed work in NSW and is carried out by an appropriately licensed waterproofer. On completion you should receive documentation identifying the product used, the areas covered and who applied it. Keep it — your owners corporation will want a copy, and a future buyer's inspector may ask.
How long does the membrane take to cure?
It depends on the product, the number of coats and the conditions, and the manufacturer's data sheet governs it. In practice it is days rather than hours, and the wait is not negotiable — tiling over a membrane that has not cured is one of the few mistakes that cannot be fixed later without starting again.
Can you waterproof over the existing tiles?
It is sometimes done, and we generally advise against it in an older unit. You inherit whatever the old bedding and falls were, the floor level rises by 25 mm or more against the doorway and the toilet, and you never find out what was under there. Taking it back to slab is the point at which the falls can actually be corrected.
Why does my old bathroom have no membrane at all?
Because for a long time a thick sand-and-cement bed was considered sufficient. Many bathrooms from the 1950s to 1970s have no membrane whatever, which is why the leaks in those buildings tend to appear as damp on a neighbour's ceiling rather than as a visible drip.
How do you decide the tile set-out?
It is drawn before the tile is ordered. We work out where whole tiles land at the most visible edges — the wall you see from the door, the shower wall, around the niche — and where cuts can be hidden. The niche is sized to the tile rather than the tile cut to the niche.